Before proceeding please make sure you have assigned static IP for the server and have internet connectivity for installing packages.
Setup mail server on centos 7
1. Installing packages
2. Postfix configuration
3. Dovecot configuration
4. User creation
Installing packages
Step 1 » Assign hostname for the server using the below command.
[root@krizna ~]# hostnamectl set-hostname mail.krizna.com
Step 2 » Make a host entry with your IP in /etc/hosts file.
172.27.0.51 mail.krizna.com
Step 3 » Now start installing packages.
[root@krizna ~]# yum -y install postfix dovecot
After package installation continue with postfix configuration.
Postfix configuration
First create SSL certificate for encryption.
Step 4 » Follow the below steps one by one for creation.
[root@mail ~]# mkdir /etc/postfix/sslLeave blank for A challenge password [] value in the below step.
[root@mail ~]# cd /etc/postfix/ssl
[root@krizna ssl]# openssl genrsa -des3 -out server.key 2048
[root@krizna ssl]# openssl rsa -in server.key -out server.key.insecure
[root@krizna ssl]# mv server.key server.key.secure
[root@krizna ssl]# mv server.key.insecure server.key
[root@krizna ssl]# openssl req -new -key server.key -out server.csr

[root@krizna ssl]# openssl x509 -req -days 365 -in server.csr -signkey server.key -out server.crt
Step 5 » Now open /etc/postfix/main.cf file for changes.
Find and uncomment the below lines.
#inet_interfaces = localhost #---> line no 116

#mydestination = $myhostname, localhost.$mydomain, localhost #--> line no 164
and add below lines at the end of the file. change myhostname and mydomainvalues with yours and home_mailbox value to your desired directory. Here it will store mails in the users home directory (Eg: /home/john/mail ).
|
1
2
3
4
5
6
7
8
9
10
11
12
13
14
15
16
17
18
19
20
21
22
23
|
myhostname = mail.krizna.com
mydomain = krizna.com
myorigin = $mydomain
home_mailbox = mail/
mynetworks = 127.0.0.0/8
inet_interfaces = all
mydestination = $myhostname, localhost.$mydomain, localhost, $mydomain
smtpd_sasl_type = dovecot
smtpd_sasl_path = private/auth
smtpd_sasl_local_domain =
smtpd_sasl_security_options = noanonymous
broken_sasl_auth_clients = yes
smtpd_sasl_auth_enable = yes
smtpd_recipient_restrictions = permit_sasl_authenticated,permit_mynetworks,reject_unauth_destination
smtp_tls_security_level = may
smtpd_tls_security_level = may
smtp_tls_note_starttls_offer = yes
smtpd_tls_loglevel = 1
smtpd_tls_key_file = /etc/postfix/ssl/server.key
smtpd_tls_cert_file = /etc/postfix/ssl/server.crt
smtpd_tls_received_header = yes
smtpd_tls_session_cache_timeout = 3600s
tls_random_source = dev:/dev/urandom
|
Step 6 » Open /etc/postfix/master.cf file, add the below lines after “smtp inet n – n – – smtpd” line.
|
1
2
3
4
5
6
7
8
9
10
|
submission inet n – n – – smtpd
–o syslog_name=postfix/submission
–o smtpd_sasl_auth_enable=yes
–o smtpd_recipient_restrictions=permit_sasl_authenticated,reject
–o milter_macro_daemon_name=ORIGINATING
smtps inet n – n – – smtpd
–o syslog_name=postfix/smtps
–o smtpd_sasl_auth_enable=yes
–o smtpd_recipient_restrictions=permit_sasl_authenticated,reject
–o milter_macro_daemon_name=ORIGINATING
|
Now check the configuration using postfix check command.
Step 7 » Now configure Dovecot SASL for SMTP Auth. Open /etc/dovecot/conf.d/10-master.conf file, find “# Postfix smtp-auth” line ( line no:95 ) and add the below lines.
# Postfix smtp-auth

unix_listener /var/spool/postfix/private/auth {

mode = 0660

user = postfix

group = postfix

}
Step 8 » Open /etc/dovecot/conf.d/10-auth.conf file, find “auth_mechanisms = plain” ( Line no: 100 ) and add login to the value like below.
auth_mechanisms = plain login
Step 9 » Postfix configuration is over. Now restart both postfix and dovecot services and enable auto start.
[root@mail ~]# systemctl restart postfix

[root@mail ~]# systemctl enable postfix

[root@mail ~]# systemctl restart dovecot

[root@mail ~]# systemctl enable dovecot
Step 10 » Add the firewall rules to allow 25, 587 and 465 ports.
[root@mail ~]# firewall-cmd --permanent --add-service=smtpNow start testing connectivity for each ports 25,587 and 465 using telnet and make sure you are getting AUTH PLAIN LOGIN line after issuing ehlo mail.krizna.comcommand in telnet.
[root@mail ~]# firewall-cmd --permanent --add-port=587/tcp
[root@mail ~]# firewall-cmd --permanent --add-port=465/tcp
[root@mail ~]# firewall-cmd --reload
[root@mail ~]# telnet mail.krizna.com 465

Trying 172.27.0.51...

Connected to mail.krizna.com.

Escape character is '^]'.

220 mail.krizna.com ESMTP Postfix

ehlo mail.krizna.com <------- Type this command

250-mail.krizna.com

250-PIPELINING

250-SIZE 10240000

250-VRFY

250-ETRN

250-STARTTLS

250-AUTH PLAIN LOGIN

250-AUTH=PLAIN LOGIN

250-ENHANCEDSTATUSCODES

250-8BITMIME

250 DSN
Dovecot configuration
Start configuring Dovecot .
Step 11 » Open /etc/dovecot/conf.d/10-mail.conf file, find #mail_location = (line no : 30 ) and add the same directory which is given to home_mailbox in the postfix config file ( Step 5).
mail_location = maildir:~/mail
Step 12 » Open /etc/dovecot/conf.d/20-pop3.conf file, find and uncomment the below line ( line no : 50 ) .
pop3_uidl_format = %08Xu%08Xv
Step 13 » Restart dovecot service.
[root@mail ~]# systemctl restart dovecot
Step 14 » Add firewall rules to allow 110,143,993 and 995.
[root@mail ~]# firewall-cmd --permanent --add-port=110/tcp

[root@mail ~]# firewall-cmd --permanent --add-service=pop3s

[root@mail ~]# firewall-cmd --permanent --add-port=143/tcp

[root@mail ~]# firewall-cmd --permanent --add-service=imaps

[root@mail ~]# firewall-cmd --reload
Check the connectivity for the ports 110,143,993 and 995 using telnet.
User creation
Now create user for testing .
Step 15 » Create user with /sbin/nologin shell to restrict login access.
[root@mail ~]# useradd -m john -s /sbin/nologin

[root@mail ~]# passwd john
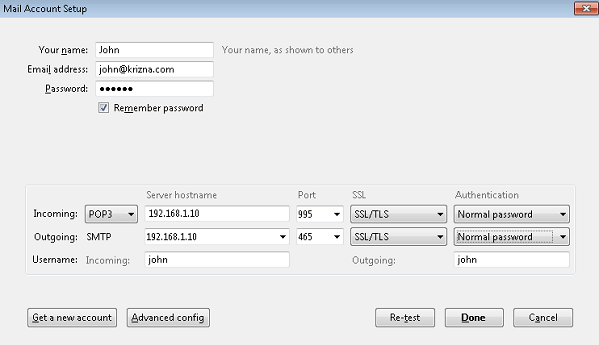
Mail server is ready now, Configure user in your mail client and test send/receive.